|
How
to
Setting up the hotkeys
Set up timeout and size
Sound operations
Set up recording folder
Game bar video settings
Troubleshooting
Windows
Game Bar and WMC Game
The Game Bar (GameDVR)
application included in Windows 10 and 11 allows users to capture PC games,
videos, documents, and images from their computer screens. WMC Game is
designed to assist users in optimally utilizing this feature. While
the Windows Game Bar is utilized for recording games and videos, WMC Game
introduces additional features to enhance the usage of the Game Bar, as
outlined below:
·
A user interface - for starting, stopping and
monitoring the recording process
·
Recording timeouts - for limiting recording
duration
·
Recording file sizes - for limiting the size of
recording files
·
Adjustable recording quality - selectable video
bitrates and frame rates
·
Adjustable recording window size - selectable HD
and/or other recording window sizes
· Setting
up Captures folders, renaming, converting recordings, and more
How
to record games and videos with
the Game Bar and WMC Game
Press Window Key + G
to check if the Game Bar is installed and running:
Windows Key + Alt + R - Windows Game Bar start/stop recording
Windows Key + G - Windows Game Bar settings and/or start/stop
recording
WMC Game operating
instructions
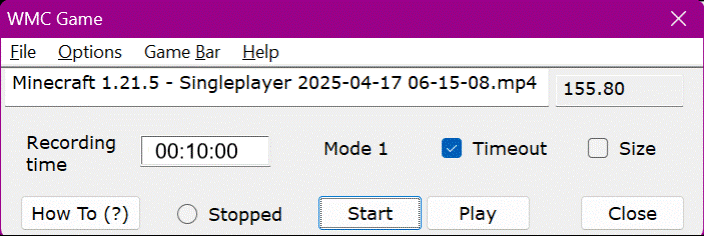
Launch WMC Game before starting the
recording. The WMC Game interface opens
in a minimized state and a few brief beeps are played to indicate its
presence; click the taskbar icon to display the main screen.
Default hotkeys
Shift + Z - WMC Game Start/Stop
Shift + X - WMC Game status message
Shift + C - WMC Game mute/unmute beeps, show/hide status message
Two operating modes are
available which can be selected from Options > Select Start/Stop
modes.
Mode 1 - Using the Game Bar hotkeys (default)
Start/Stop - press the Game Bar hotkey Windows Key + Alt + R.
This starts the Game Bar recording and WMC Game monitoring.
When recording begins, the Game Bar logo is displayed, and the Record
Start OK sound is played. When recording stops, the Record End OK sound
is played. A mouse click on the Game Bar logo will also stop recording.
If a Timeout or a file Size limit are set up recording stops
automatically when these limits are reached.
Mode 2 - Using the WMC Game hotkeys
This mode should be used if
Mode 1 does not work on a computer (reason unknown). Unlike Mode 1, WMC
Games uses its own hotkeys or buttons to get started while the Game Bar
hotkey only starts the recording.
Start/Stop WMC Game – press the WMC Game Start/Stop hotkey or
click the Start button.
Start/Stop recording - press the Game Bar hotkeys Windows Key +
Alt + R.
When recording begins, the Game Bar logo is displayed, and the Record
Start OK sound is played indicating WMC Game is monitoring your
recording.
Stop recording – press the Start/Stop hotkey or, click the
WMC Game Stop button (if visible) or, click the Game Bar logo.
Recording will also stop automatically if a Timeout or a file Size
limit are set up.
Important notes
Recording window focus: The recorded window must have the focus, otherwise
recording does not begin. To set the focus, click the window top bar,
minimize and restore the window or set the window Fullscreen. Fullscreen
games always have the focus. (see also Troubleshooting on this)
Game Bar recording delay: After pressing the Game Bar hotkeys, the recording logo
should be displayed showing recording is in progress. Sometimes, Gam
Bar takes 5 to 10 seconds to begin recording and display the logo. You can
try to press the Game Bar hotkeys one or two more times even if the Game
Bar displays an error message.
Reset the Game Bar: if the Game Bar refuse to begin recording try a
reset. Minimize all windows then press the Game Bar hotkeys. If WMC Game is
running (minimized) you can hear a beep when doing this.
Set up WMC Game hotkeys
Click File > Hotkeys
to open the Hotkey dialog
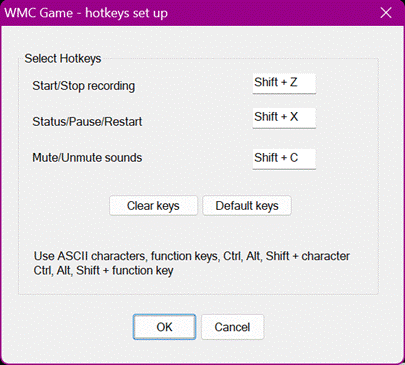
Hotkeys are necessary when using
Mode 2, however once set up they can be used by Mode 1 too. As shown above,
WM Game must first start using the Start/Stop hotkey before initiating the
Game Bar recording.
Set up a Timeout and a file
size limit
Before setting up a timeout
click File > Game bar Captures settings to open the Game Bar
settings and make sure the Max recording length is larger than your
timeout.
Set up recording timeout - click Timeout on the main screen, WMC
Message opens. Enter a time under Recording Time (hr:min:sec) then
click OK on the message box to save. The estimated file size for the
selected recording time is displayed.
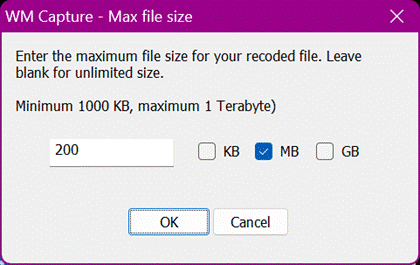
Set up max recording file
size - click Size to open
the Max File Size dialog then enter the file size limit.
WMC Game sounds operation
Mute, Volume - open Options > Sounds.
Click Mute to toggle between mute/unmute all WMV Game sounds.
Pressing A + S keys together also mutes all sounds.
Click WM sounds volume to toggle between normal volume and lower
volume (1/10 volume). This setup does not affect the system volume. We
recommend to turn on WMC sounds.
Game Bar video settings
Click Game Bar > Video
Settings to open the Game Bar video settings dialog
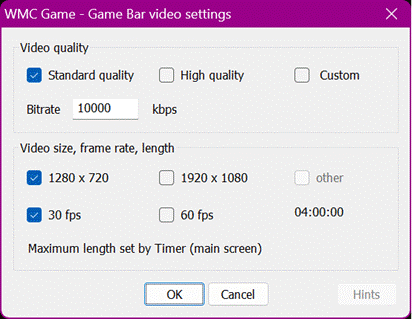
Here you can setup a video
quality by using Game Bar Standard or High quality or your own quality. On
a small computer screen good quality recording of streaming movies can be achieved
with a lower bitrate number which significantly reduces the recording file
size. You can also specify the recording video size (720 or 1080) and the
frame rate (30 or 60).
How
to set up your recordings folder
Before any changes are made
Windows sets up the folder Captures located under the library called Video
as the recording folder for the Game Bar recordings (usually this folder
location is
C:\Users\<your username>\Videos) . You can change or move the
location and name of the Captures folder using WMC Game and the Game Bar
Captions setup.
To change the Captures file name,
open the Game Bar Captures from WMC Game (File > Game Bar Captures
video settings) or from Windows (Windows key > Settings >
Games > Captures)
· in the Game Bar Captures click Open folder to
open Windows Explorer, find the folder name, change its name (you can only
change the file name or the folder name, not the drive name, i.e. you
cannot change C:\Name to D:\name or D:\name1)
· in WMC Game click File > Setup your Captures
folder to open the 'Browse For Folder' dialog and select this new
folder name
(note that the Game Bar
Captures does not show the new name until you restart Windows however the
recordings are saved in the new folder...duh!!).
To move the Captures folder
to a different location, open Windows Explorer then Cut/Paste the
folder to the new location.
To replace one external drive
with another external drive, Cut/Paste the external drive folder to
computer, insert the new drive and Cut/Paste the folder from computer to
the new drive.
Troubleshooting
1. Game Bar shows message
'Recording isn't working"
This indicates that Game Bar
did not find any focused window. Press Windows Key + G to open Game
Bar settings and see if there is any window name listed (in the upper left
corner). To set focus, click the window top bar, minimize and restore the
window or set the window Fullscreen. Fullscreen games always have the
focus.
2. Captures folder not found
When opened for the first
time, WMC Game detects the Windows Captures folder name and location at
startup. If there is a problem,
click File > Game Bar
Captures video settings to open the Windows Captures setup, Here you
can see the name of the Captures folder. Do the following
· in Windows Captures click Open folder to open Windows
Explorer, copy the folder path from Windows Explorer
· in WMC Game click File, Setup your Captures folder
to open the 'Browse For Folder' dialog, paste the path under Folder,
click OK to exit
3. Captures folder moved to
external drive
If your Captures folder is on
an external drive and the drive is not connected when you turn ON computer
Windows sets up a different Captures folder (usually C:\Users\>your username>Appdata\Local\Temp.)
If you reconnect the same external drive the old folder name will be
recognized and set up.
However, if you don't use the
same driver, you're out of options. Don't try to rename or move the Temp
folder. We recommend the following (we're not aware of other ways to do
this):
· connect the new external drive
· in WMC Game click File > Setup your Captures
folder to open the 'Browse For Folder' dialog and set up the new folder
name
· close WMC Game and restart Windows with the external
hard drive connected
4. Game Bar reset
If Game Bar repeatedly shows
"Recording isn't working" try a reset by doing this:
· minimize all windows on your desktop then click the
Game Bar hotkeys one or two times
·
open a window, click Windows
key + G to open Game Bar settings
·
find out if the window name
is listed under Capture
· click the Start Recording dot or press the Game Bar
hotkeys
5. Restart Windows Game Bar
Reset the Xbox Game Bar App:
· Open Settings > Apps > Apps & features.
· Find the Xbox Game Bar, click Advanced options, and
select Reset.
· Restart your PC and try relaunching the Game Bar
Other troubleshooting tips
https://learn.microsoft.com/en-us/answers/questions/443550/my-xbox-game-bar-automatically-disabled-and-doesnt
https://support.xbox.com/en-US/help/games-apps/game-setup-and-play/troubleshoot-game-bar-windows
©
Copyright AllAlex,Inc
|