|
WM Capture 10 records videos like a camera pointed to your
screen or a portion of your screen. It also records audio from your
speakers or from an external audio source. No video or audio data is
downloaded from the Internet.
WM Capture 10 main and added features
·
UHD/2K/4k recording
·
H264 video format, Intel Quick Sync (if
computer supports)
·
H264 video format, NVIDIA NVENC (if computer
supports)
·
Picture in Picture (PIP) video playback and
recording
·
Any kind of audio sources and microphones,
including Bluetooth, USB, resample audio rates
·
AAC and MP3 audio formats
·
CPU loading monitor
·
WM Converter Pro
WM Capture 10 provides two recording modes: a conventional Screen Capture mode and an advanced
recording mode which maximizes your video capture performance, the Background mode. This User Guide refers mostly to versions 10 or higher,
however many of the features are also supported by versions 8 and 9.
WM Capture 10 is a "plug and play" program and after
the installation it should be ready for recording.
Requirements
· any
Windows versions from 7 to 11
·
no special computer memory, speed, number of
CPUs required for operating the program
· see
below Simple recording guides for high quality recordings
In general, use the
guides below to get the best quality recordings:
·
try using the Background mode on Windows 8, 10, 11 or UHD monitors
·
always use Windows Basic mode (Aero disabled) on Windows 7
·
select the highest frame rate your system
supports (see below)
·
select the highest video bitrate
Simple
recording guides
The quality of recorded videos depends primarily on the frame rate
(fps) your system can sustain and the selected video bitrate (kbps). A high
frame rate makes a smooth motion video, a high bitrate makes a clear, sharp
video. While recording, WM Capture
10 displays the message "Frame
Rate too high" if the selected frame rate is higher than the rate
the system can sustain. If this message appears repeatedly you may need to
lower the frame rate from Settings and/or the size of the recorded video
window.
The table below shows some tested frame rates for
different video sizes and CPU performance when either Background mode or Windows Basic mode (Aero disabled) are used. When using the regular Screen Capture mode, the recorded frames rates may be lower
(depending on the video window size and/or computer speed).
|
Video Format
|
Video Size
|
CPU
|
fps
|
Usage
|
|
MPEG-2
|
1920x1080
|
i5/i7 Quad 2.4 GHz
|
30p
|
high quality movies, HD
videos, games, DVD video format
|
|
|
1280x720
|
i5/i7 Quad 2.4 GHz
|
30p to 60p
|
|
|
lower
|
Any 2 or 4 cores
|
25p to 60p
|
|
H264-AAC/MP4
|
1920x1080 (HD)
1920x1080
1280x720
2K/4K
|
i3/i5/ Dual core
i7 Quad core
i7 Quad core
i7 Quad, 8GB
|
30p
60p
up to 100p
30p
|
high quality movies,
HD, 2K, 4K videos,
games
|
|
Windows Media
|
1920x1080
|
i5/i7 Quad 2.4 GHz
|
20
|
movies, webinars, web,
documents, any video, or audio
|
|
|
1280x720
|
i5/i7 Quad 2.4 GHz
|
30 to 60
|
|
|
lower
|
Any 2 or 4 cores
|
25 to 100
|
|
Windows Media Screen
|
Up to 1920x1080
|
any
|
10
|
slide shows, documents, slow
moving webinars
|
|
MPEG-4 (AVI)
|
Up to 1280x720
|
i5/i7 Quad 2.4 GHz
|
15
|
small size videos, full
size documents
|
· MPEG-2 and h264 use progressive scan (p) in all
cases (30p - progressive is equivalent to 60i - interlaced. Most Internet
HD movies are broadcasted at 720/60p or 720/30p)
· On some older Windows 7 computers H264 Quick Sync
installs Microsoft MP4 (not recommended for recording. Use MPEG-2, Windows
Media, or MPEG-4 instead)
1. Open WM Capture
No changes are made to your computer settings when opening WM Capture.
(Note: on Windows 7 and Vista WM Capture sets
up your Windows desktop theme to Windows
Basic. This is necessary to maximize your computer performance for
recording. Your regular Windows desktop theme will be restored when WM
Capture closes.)
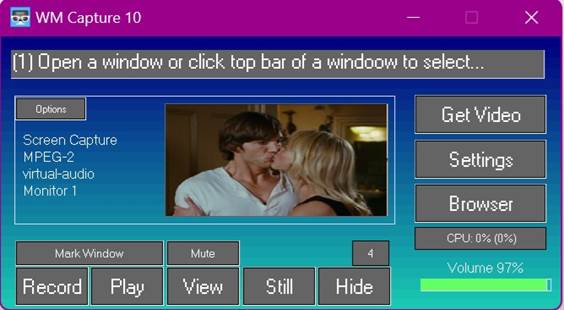
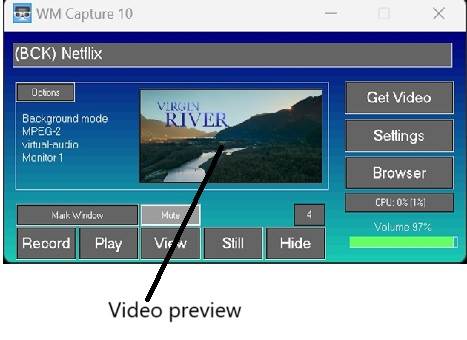
2. Mark the video area
You can do this in two ways:
·
Automatic
- using the Get Video button
(see image above). This works with motion videos only. WM Capture uses
screen motion detection and captures the motion area of your screen (a
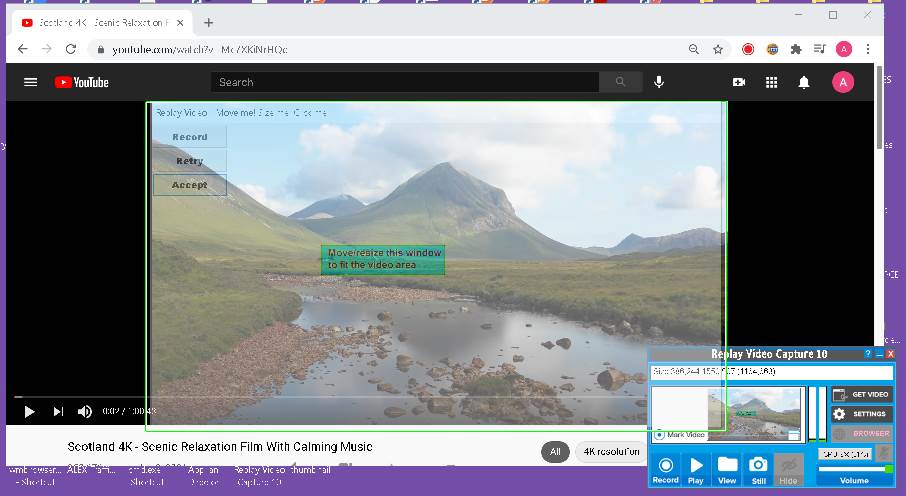
motion video for example). Play your video, then click the Get Video button. A
semi-transparent window is overlapped onto the video area (see the image
below). You can move or resize this window if you need to fine tune the
marked area.
·
Manual
- using the Mark Video Window
button. When you click this button, a semi-transparent window is displayed
on the screen. Move and resize this window to mark the recording area.
3. Begin recording
Click the Record button to
begin recording. The video is now recorded, and a small Preview window
appears on WM Capture main screen showing the actual recording.
4. Stop recording (manual,
time-out, size-out)
·
Once the recording begins the Record button turns to Stop, and the Play button turns to Pause.
You can click Stop or Pause to Stop/Pause recording.
·
You can setup a Recording Time or a
Recording File Size in Settings. Recording stops when either one of these
values is reached.
5. Playback the recording
To play the last recording click Play.
To open the storage folder and see all your recordings click the View button.
Note:
when using the Screen Capture recording mode, you cannot open other windows
covering the video window while recording. However, you can do this when
using the Background mode.
The Background mode is particularly useful in the
following situations:
· while recording, you can use your computer screen to
run other programs and overlap the recording window without obscuring the
recording area
· higher frame rates can be obtained, and larger video
windows can be recorded. (see the Video Format table above)
· recording UHD/2K/4K videos or recording on 4K computers
or 4K external displays
· recording and playing videos as
Picture in Picture (PIP)
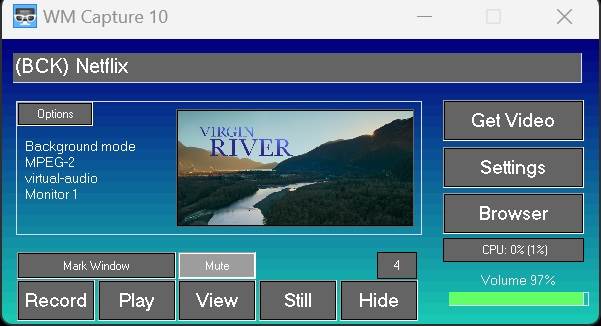
1. Setup the Background mode
Click Options then click Switch
to Background mode. Or, in the Settings dialog click Enable under Background mode. When
using the Settings, the Background dialog shows a browser selection option.
Here you can choose a browser, or
other programs that you like to open while recording.
2. Hide/Show the recording
window
If you want to hide the recording window use the Hide / Show buttons to hide or show the window. (Note that Hide
makes the image invisible but keeps the video stream alive and it is
different than Minimize which kills the video stream).
3. Open another browser or
program while recording (Background mode)
Click Browser on WM Capture
main screen to open the selected browser or open another program. WM Recorder
continues to record in the background even though the image may be entirely covered by the newly
opened windows. This feature is only available during
recording.
Tips for using the
Background mode
Background mode is particularly
useful when recording large or full screen HD windows or when you need to
use the screen to do other things while recording. It is also required when
recording UHD videos.
·
Try minimizing other windows when setting up the
Background mode for recording one window image
·
When recording from a web browser, background mode
requires disabling the graphic acceleration. However, if you want to keep
the acceleration enabled in your browser, you can use the Chrome Canary version of the Chrome browser as
your recording browser instead of your regular browser.
·
WM Capture main screen is not visible in recording
even if it overlaps the recorded video window. We recommend to keep it
visible.
·
We got reports that the Background mode could not
be used with Microsoft Edge on some Windows 11 computers.
See below Troubleshooting the background mode
Picture in Picture (PIP)
playback and recording (new feature)
Picture in Picture (PIP) is only available with
the Background mode. Click Settings, Tools, Video options, Picture in
Picture, Enable or Options, Picture in Picture to enable PIP playback. Click Picture in Picture, Record to enable PIP recording. When you enable the PIP
a Detach button is shown on the Preview window on WM
Capture main screen. When you click this button the PIP playback window
opens. Clicking the PIP video image opens a menu where you can Hide/Show
the main recording window, open another window (Browser), minimize the PIP
or Record.
Example of using the PIP play and recording
Watch this short video for an
example of using the Background mode. In this video, WM Capture uses the
Background mode and the PIP (Picture in Picture) play and record feature.
·
play
your video, on WM Capture main screen click Detach to create a PIP video,
·
click
Hide to hide the actual playing video,
·
click
Record to begin recording.
·
while
the video is playing and recording in the PIP frame open the browser or
other programs and use the screen for doing something else.
Watch
this video and see how this unique
feature works.
Playing or recording UHD (2K/4K)
videos depends primarily on your computer performance characteristics.
Features like I7, Quad core, 8 GB memory are minimum necessary. Below are
some hints about 4K playing and recording:
· play the video you want to record, make sure the video
plays without stuttering. If it does stutter, try to lower the size of the
recorded video or use Windows Display settings to select a lower screen
resolution. For example, a 4k display can be resized to a 2K display
resolution (2560x1440 is the preferred size). A 2K video
can be recorded at 50 fps even with a medium cost and performance laptop
connected to a 4K second monitor.
· on WM Capture main screen watch the CPU loading numbers
and make sure, before you start recording, CPU loading is below 50%
· always use Intel Quick Sync and the Background mode
with your browser (Chrome, Microsoft Edge, Vivaldi, Firefox)
UHD recording (and playing) uses a lot of computer
memory. On Windows
versions before Windows 11 it may be necessary to
clear this memory when a recording is finished. WM Capture needs to
manually close and restart when a recording is finished. The program opens
automatically after this. This operation is done automatically when using
the Scheduler to allow for multiple scheduled recordings.
To enable/disable this feature open Options, Other utilities, Clear
memory.
Google Chrome Canary is a version of the Chrome browser which can be
installed and used for recording. Starting with version 89, March 2021 the
regular Google Chrome browser made changes that block screen recording of
most movies streamed from the Internet. The work around is to disable the
browser graphics (hardware) acceleration. Chrome Canary browser does not have these limitations.
WM Capture can set up this
browser to work in both Screen Capture and Background modes with no need for changing browser
settings. You can continue using your regular Chrome browser with no
changes for your usual browsing and use the Chrome Canary for recording.
The
Options menu
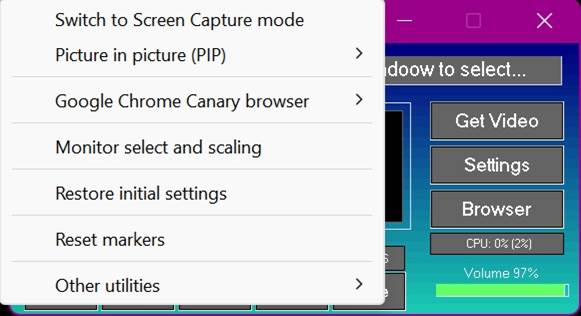
· Switch to Background mode / Switch to Screen
Capture mode: select between Background
and Screen-Capture recording modes.
· Picture in Picture (PIP): open
the PIP mode for playback and/or recording.
·
Google Chrome
Canary browser: open, install create shortcut for the
Canary browser
·
Monitor
select and scaling: use this to find out your monitor(s) settings and
select the main and the secondary monitor. We recommend not to change the
default values.
·
Restore initial
settings: restore settings to their initial values when WM
Capture was installed.
·
Reset markers:
restore all settings to their initial values (needs restart)
·
Reopen last hidden
window: use this to restore a hidden window that does not
respond to pushing the Show button. This situation could occur in the
Background mode.
·
Open Windows Sound:
open the Window Sound dialog where you can see or change your audio
settings
The
Settings dialog
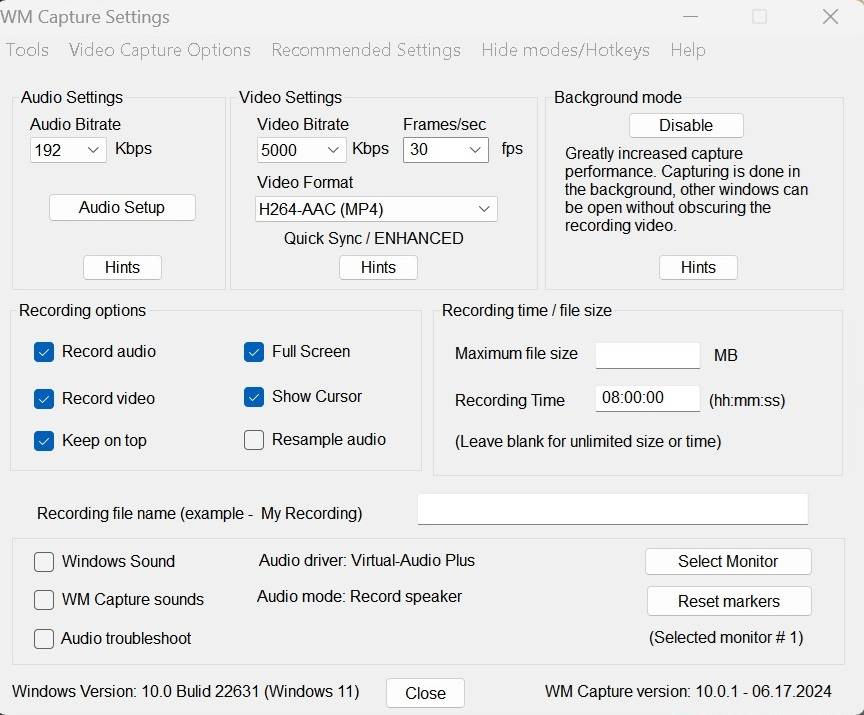
Buttons:
·
Audio Bitrate: audio bitrate for the recorded audio.
Default, 192K
·
Audio Setup manually
set the audio driver used for recording as well as the dual audio recording
feature
·
Video Bitrate,
Frames/sec: video bitrate
and number of frames per second for the video format selected
· Video Format: select a video format. Default MPEG2 (this format is compatible with all Windows computers)
·
Windows
Sound: opens the Windows Sound dialog for selecting and setting an
audio source
·
WM
Capture sounds: shows the audio sources and settings used by WM Capture
·
Audio
troubleshoot: shows audio troubleshooting instructions
·
Select
monitor: select the default monitor when using a second monitor
·
Reset
markers: reset the marked area of the screen to the default position
and size
Recording Options:
· Record Audio: turn on or off
audio recording. This is useful for making "silent movies” and then
adding voice or music using the Dual Audio mode.
· Record Video: turn this option
off if you want to make WM Capture into an audio-only recorder. The audio
format can be setup under Tools, Audio Options, Audio formats (MP3, AAC,
WMA, WAV)
·
Resample
audio: used when audio sources used for recording do not have the
Windows default sample rates (44100 Hz or 48000 Hz). This option should not
be changed.
· Background mode: Enable/Disable requires shutting down WM Capture
Recording File Size / Time:
This lets you limit the time or file size of your recordings. Handy for
unattended recordings.
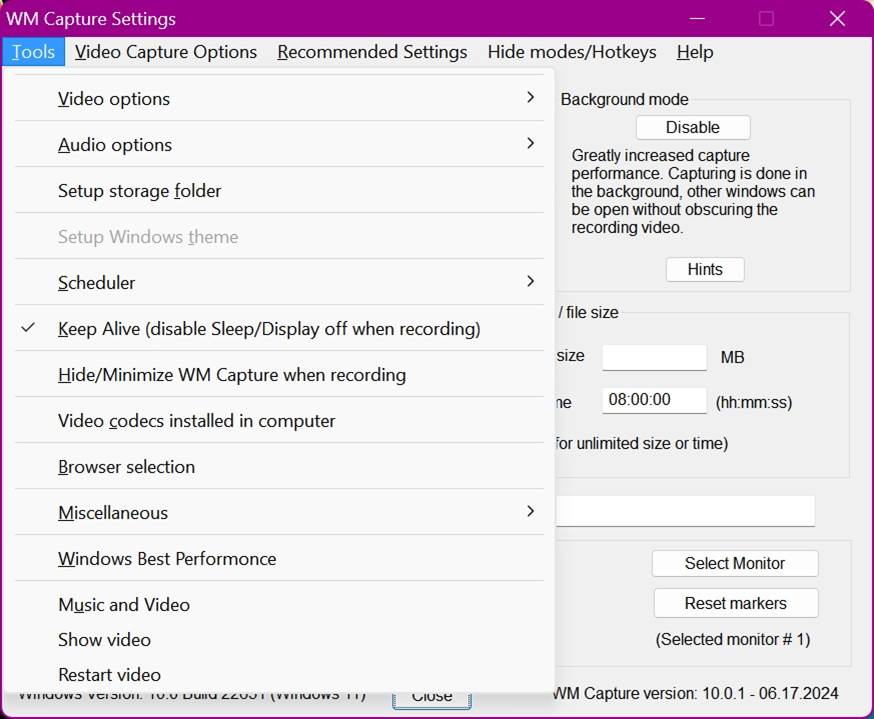
Top menu
settings
Tools menu
Video Options
1. Show video preview (playback only, no
recording): disable/enable the real time
video preview window. This is a small video window on WM Capture main screen showing the portion of the
screen marked for recording.
· Show mini pane while recording: a small pane placed at the bottom of the screen showing
recording time, FPS and CPU loading numbers when using a hide mode for
recording
· Disable CPU monitor: CPU loading monitor (see below)
· CPU specs: your computer CPU specifications. Some CPU versions
show if Quick Sync is available.
· Reset markers: reset the screen marking window to its initial
coordinates
Audio Options
Audio Formats: use to select audio format for audio only recordings
· Audio Boost: raises audio recorded level by specified number of
(may distort). If your recorded audio level is too low or too high use
WM Converter to compress to a higher or lower level.
· Test speakers: check if the playback computer audio source is mono or
stereo (WM Capture versions prior to 10 only check for stereo 44100 or
48000 sample rate - Windows default audio for playback and record)
· Open Windows Sound: opens the Windows Sound dialog (on Windows 10 it may
take a while to open)
Setup Storage Folder: Choose
the folder on your PC where recorded files are saved. ANSI and UNICODE
folder names and file names are accepted.
Scheduler: Open the Scheduler
·
Open
now: opens scheduler now
·
Open
when WM Capture opens:
Open: click to enable this option
Record full time: record the
entire time set up in the Scheduler
Record only remaining time: record
time left from opening to the end of set up time
· Close browser when recording times out
· Reload web browser: WM Capture Scheduler will try to reload
the web browser if no video or audio motion is detected over about 1 minute
period
Hide/Minimize WM Capture:
Opens the Hide Mode dialog. Use this feature to setup hotkeys and hide
modes for hiding WM Recorder main screen when using the Screen Capture
mode. Not necessary when using the Background mode. WM Capture main screen
is not recorded in this mode.
Keep Alive: use this option to prevent computer to go to Sleep
or prevent screen savers opening while recording.
Setup video detect mode/Setup Windows theme:
Use this option to setup the desktop theme for Windows 7 computers (use
Windows Basic theme to increase the performance of your computer). Not
available on Windows 8/11.
Video Codecs installed on your computer: you can select a
previously installed codec on your computer (not installed by WM Capture).
Some of these codecs may not work.
Browser selection for Background mode: select a browser or a
program that opens when you click the Browse button in Background mode. If
no browser was selected a Windows Explorer page opens.
Miscellaneous
Install Microsoft redistributable: install Microsoft Visual C++
redistributable 2005, 2010 or 2013. 2005 if video capture cannot be setup,
2010, 2013 if Virtual Audio driver cannot be installed.
Run diagnostics (Log File): use this option to reinstall Windows DirectX components
required by WM Capture. The generated Log file can be emailed to us.
Disable tooltips:
disable/enable showing tooltips
Disable updates: stop WM
Capture looking for updates.
WM Capture folders: open WM
Capture installation or setup folders
Recommended Settings (top menu): configure
the Audio Settings and Video Settings for the desired output quality and
the speed of your PC.
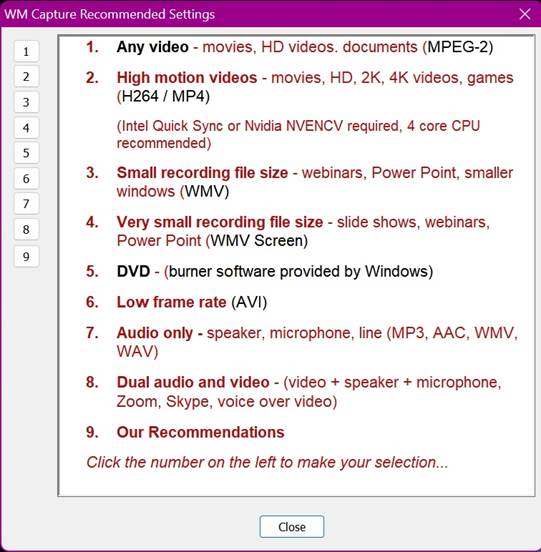
WM Capture default settings use video formats and bitrates that
produce the highest recording quality. This may lead to larger recorded
files. You can overwrite these settings.
Video Capture Options(top menu):
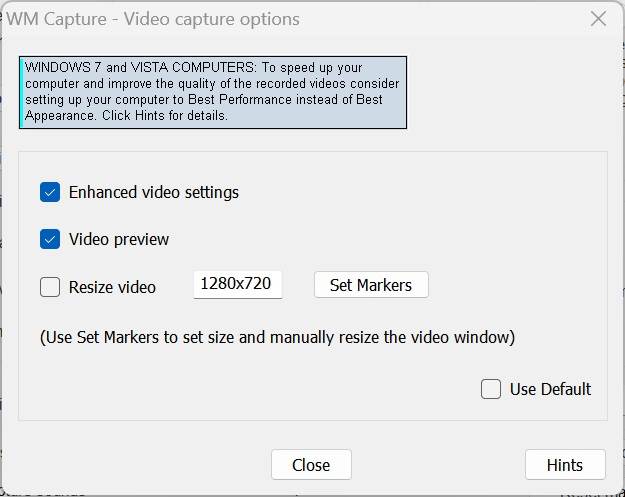
· Enhanced video mode includes
enhanced recording features like dual monitor, pause, video preview. For
H264 the Enhanced video includes features like HIGH profile, HIGH level,
auto throttle.
·
Basic video
is mostly a compromise between quality and speed.
·
Video
Preview - a small video window on the main screen duplicates the
captured image and what is recorded. In Background mode, a black or white
image shows that no window image was captured.
·
Resize video
option can be used to resize the recorded video while recording and is
available only with H264 and MPEG-2 video formats.
·
Set Markers
option can be used to set the recording area to a specified width and
height. You should move/resize the video window you want to record to fit
this area.
Playing or recording videos
could load up your CPU quite a lot depending on the video size, video frame
rate, HD, UHD formats, CPU performance characteristics and a few other factors. When using Intel Quick Sync or Nvidia
NVENC half of the normal CPU loading is transferred to the GPU (hardware
encoding) which means, significant CPU loading reduction is achieved. WM
Capture 10 displays the CPU loading as two percentage numbers:
program
loading (%), computer loading (%)
program loading is the loading produced by WM Capture at the
current time
computer loading is the CPU loading produced by all running
programs except WM Capture at current time.
WM Capture program loading,
and computer CPU loading are displayed on the main screen as shown below.
Click the image to turn ON or OFF CPU monitoring.

Important: When using the Quick Sync video format on some
Windows 7 (single or dual core computers, older computers) WM Capture
loading may be much higher than usual (normally below 10%). This is because
this video format is not the actual Quick Sync MP format but a Microsoft
MP4 format which is quite slow. Use MPEG-2 format in this case.
To record full screen motion video open Settings then
check the Full Screen checkbox. We recommend using H264 at bitrates higher than 3000 kbps or MPEG-2 at bitrates higher
than 8000 kbps and the Background mode. When recording in Screen Capture
mode use the hotkeys to start/stop/pause recording. It is good to do a
short recording first and check the recording quality (see below why).
Important (for older versions): when using the Background mode start recording after the recording
video window was maximized to full screen. Switching from normal to full
screen while recording may not work.
Recording full screen videos is
necessary when the broadcast is really in a Fullscreen or Full HD
format. Currently, most external computers monitors are Full HD resolution
(1920x1080) or higher. For many laptops, the usual resolution is 1366x768,
however 1080 and 4K laptops are also popular. High Definition broadcasts
are 720 or 1080 horizontal lines of pixels. There is no reason to stride
and record a 720 video to a Fullscreen 768 or 1080 size. This puts an
unnecessary burden on the CPU. You should record full screen videos and
movies only if the broadcast is in 1080 format. Otherwise use the 720
format or resize the video to 720. The 720 videos can be recorded at 60p
(120i ) or higher fps using MPEG-2 or H264.
Using
the Hotkeys and Hide modes
The Hide modes/Hotkeys dialog
Important: when using the
Background mode or Windows Basic theme (on Windows 7), WM Capture main
screen is invisible to recording. You can see a lot of recording
information here. There is no reason to hide the WM Capture main screen in
this case.
Setting
up the Hotkeys
Click Settings then click Hide modes/Hotkeys on the Top menu to open the Hotkeys dialog. Here you
can setup the hotkeys you set up to duplicate buttons for Record, Pause,
Mute/Unmute microphone. While recording, you can use the Mini Pane option (see
below) to show the actual frame rate achieved by your system and other
useful information.
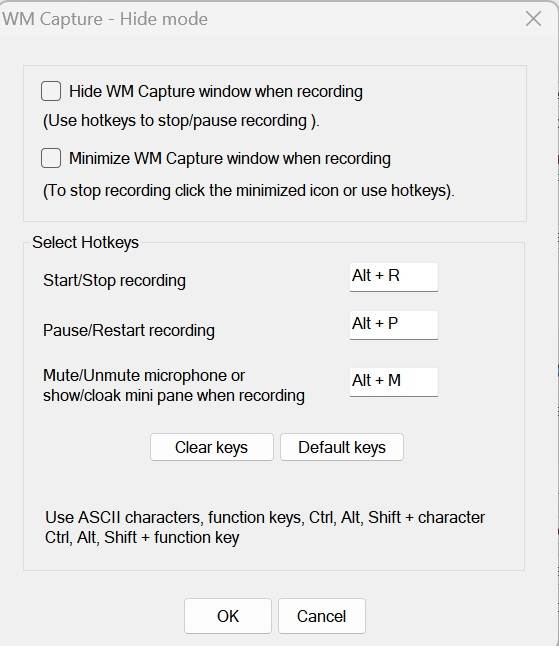
Setting
up Hide modes
WM Capture main screen can be completely hidden when you check "Hide WM
Capture window when recording" or minimized
in the taskbar when you check "Minimize WM Capture window when
recording". When selecting a Hide mode, you can also select
showing a small "Mini Pane" at the
bottom of the screen while recording. This may be necessary if you want to
monitor CPU usage, recorded time or recording frame rate. To enable/disable
this option use Settings, Tools, Video options, Show mini pane. Note that
when Hide WM Capture window mode is selected no icon will be shown on the
taskbar. The only way to make the main screen visible is using the hot keys
to stop or pause recording.
In Settings,
click H264-AAC (MP4). The dialog below opens. Click
Quick Sync /MP4 or NVENC (Nvidia) buttons and wait until a message is shown
above these buttons (this may take a few moments). A message lets you know
if your computer does not support these formats otherwise you should see
the message shown in the picture below. Even if the test failed, you can still try to use the selected format.
The Quick Sync format should always be used for
recording UHD videos (video window size greater than 1920x1080). The NVENC
format does not always work on UHD videos, however it has better
performance (CPU loading, video quality) on HD or lower size videos. It can
record 720 videos at 60 fps with less than 20% CPU loading.
Below is a brief description of the video/audio formats provided by
WM Capture
·
MPEG-2
is the standard video format used in all digital TV's, DVDs, and Blue Ray.
Provides highest quality screen recordings for movies, videos, games,
including full HD (1920x1080). It is also used to record files that can be
burned on DVDs. Recorded file extension is mpg or dvd.mpg if the DVD mode
is selected. To playback MPG files use VLC Media Player, Windows 10 Movies
& TV (with MPEG-2 codec) or Windows Media Player. Note that some Windows Media Player versions display MPEG-2
recorded videos at 1/2 the recorded video size.
·
H264-AAC
(MP4) is the video format used on all mobile devices and all computer brands
including Apple. Provides highest quality screen recordings for movies,
videos, games, including full HD and UHD (1920x1080 and higher). With Intel
Quick Sync CPU loading is reduced by 50% File sizes are two to three times
smaller than MPEG-2 for similar quality. The recorded file extension is
mp4. Your computer must have installed Intel Quick Sync or Nvidia NVENC.
Quick Sync is installed on all Windows 10 and all Windows 11 Intel
computers. If these features are not available use the H264-AAC (MP4
Convert) option.
·
Windows
Media format is included in all Windows computers (except for some
European PCs). It is used to record high quality movies, videos, webinars,
documents, and Power Point presentations. The recorded file extension is
wmv. To playback use VLC Media Player, Movies & TV, or Windows Media
Player. The recorded wmv files are smaller than MPEG-2 files however
recording WMV format require higher CPU usage.
·
Windows
Media Screen is included in all Windows computers. Used for recording
slide shows, documents, Power Point, slow motion webinars. The recorded
files are much smaller when compared with all other video formats, but this
format is not designed for high motion videos (movies). File extension is
wmv. To playback use Windows Media Player or VLC.
·
MPEG-4
(AVI) format can be played back on all Windows computers. It is used to
record smaller window size movies and videos. Slow moving videos like
webinars, documents, Power Point presentations can also be recorded in full
HD (1920x1080). The recorded file extension is avi. To playback use VLC
Media Player, Movies & TV, or Windows Media Player.
· H264-AAC (MP4 Convert) option can
be used to generate MP4 videos. When this option is selected WM Capture
records MPEG-2 files which are automatically converted to MP4 when
recording is finished.
Video / Audio Bitrate (kbps): this is the number of kilobytes
per second (kbps)used to digitize a video image. As a rule of thumb, “the
higher the bitrates the better video/audio quality ”. The tradeoff is that recorded
file sizes are higher.
Frames/sec (fps): this is the
number of screenshots (frames) per second in a video stream. The higher the
number of frames per second (fps) the better the video quality and
smoothness of high motion video recordings. Note that the number of
captured frames per second depends primarily on your computer performance
characteristics (speed, memory, CPU graphics, etc.) and cannot always be
set up to the desired value. To achieve high frame rates,
select the Background mode on Windows 8/11 or Windows Basic mode (Aero disabled) on Windows 7 from WM Capture
Settings. You can select a frame rate from the drop down list or type a
number in the Frame/sec box.
The Video Format table above shows some tested frame
rates for different video sizes and different computer configurations. Bouncy
video, out of sync audio or chopped audio are some of the side effects of
frame rates too high. While recording, WM Capture displays the message "Frame Rate too high" on
the top status window if the selected rate is higher than the rate the
system can sustain. If this message appears repeatedly you may need to
lower the frame rate and/or the size of the recorded video.
Note: in general, when recording using the Screen Capture mode the frame is
reduced if the computer cannot keep up with the specified rate. The Background mode however pushes the
frame rate regardless of the computer performance. This is done so the
highest quality of the recording is achieved. Sometimes this leads to
higher CPU loading on slower computers.
Use the Monitor
select dialog at startup to select the monitor you like to use (only two
monitors). You can also click Settings then click Select Monitor. Select the monitor
and make sure the video marking window does not cover both monitors. Before
switching between the two monitors, it may be a good idea to reset the
markers. Click the Reset Markers
button under Settings/Tools/Miscellaneous
to bring the markers to their initial position.
It may be good to have one monitor dedicated to recording and
another for doing your work. This allows you to open different windows on
one monitor while recording on the other.
Note: WM Capture supports one external monitor shown
on Windows to the left or to the right side of the main monitor (not on top
or bottom).
Important: WM
Capture labels the main monitor "Monitor 1" and the second
monitor "Monitor 2". Monitor 1 is always the monitor where WM
Capture opens. This is also the monitor called the ‘Main Monitor’ under
Windows, Display settings. Note that this may be different than the monitor
numbers shown when you click “Identify” under Windows Display settings.
WM
Capture automatically sets
up the audio recording when
installed for recording the speakers sound. On Windows 7, 8, 10,
11, Vista the default audio driver installed by WM Capture
is the Virtual-Audio Plus driver. You can also use the Sound-Capture driver however this driver does not work with H264-AAC
(MP4) format (see also below). It also require use of Windows default rates
(44100 Hz or 48000 Hz). These audio drivers and other options can be
accessed from Settings, Audio
Setup.
When using the Virtual-Audio or the Sound-Capture drivers the
recorded audio volume is setup by WM Capture volume control, not by the
computer volume. You can lower or mute the computer volume while recording
without changing the recorded sound volume. However, in some Windows 10
builds this feature MAY NOT work.
Important: Make sure your computer audio is NOT set to Surround or
Quadraphonic sound. WM Capture can only record stereo. See Troubleshooting
if you need to change your audio settings.
Important: Any stereo or mono playback,
microphone, internal or external audio source listed under Windows Sounds
dialog can be used for recording. Audio devices with sample rates different
than Windows default (48000Hz or 44100Hz) are automatically resampled. The
same applies for microphones whether internal or external. This includes
Bluetooth and USB devices. Sound-Capture driver cannot be used
with resampled audio sources and microphones but only with Windows default
settings.
The speaker sound can also be recorded by using your computer
internal recording software usually called "Stereo Mix" (if
available). The recorded sound volume follows the playback volume when
using the Stereo Mix.
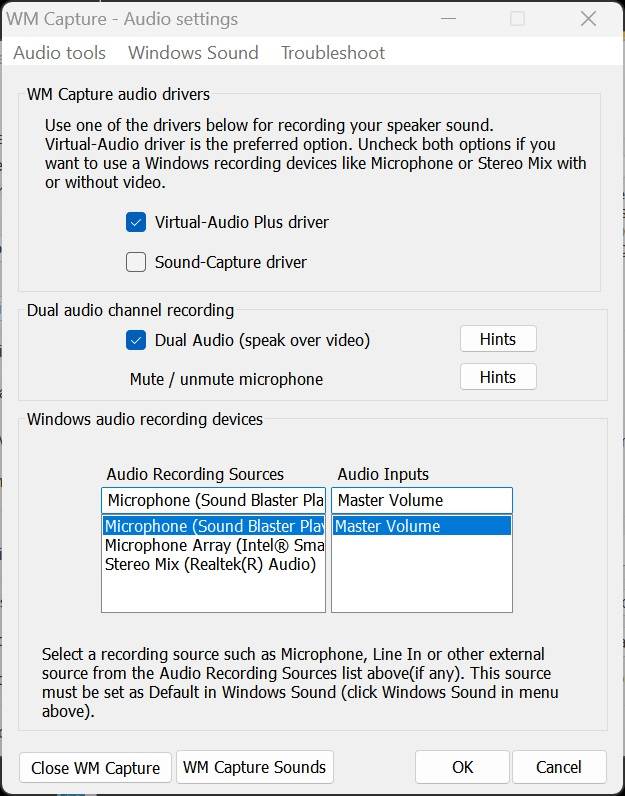
Recording a microphone or other audio
sources
To do this open Audio Settings
and uncheck the Virtual-Audio Plus or the Sound-Capture checkboxes. Then open the Audio Recording Sources dropdown list and select one of the
audio sources listed. If no audio source is displayed make sure they are
not disabled. Open the Windows Sounds dialog then right click to show the
Disabled and Disconnected device.
Changing audio sources
It’s good (but not always necessary) to close and restart WM Capture
when changing Windows audio sources, especially when changing the internal
default Windows playback source with an external Bluetooth or USB source.
After you close WM Capture, play a sound on your computer to make sure the
new source is playing the sound. Sometimes, trying to enable a microphone
on a Bluetooth source with multiple playback options disables the audio.
Make sure the new playback and/or microphone sources function ok before restarting
WM Capture.
Dual Audio
Recording
The Dual Audio option
can be used to record a second audio source in addition to the speaker
sound. In most cases this may be an internal or external microphone. To
enable Dual Audio recording follow the steps below. Your microphone must be
set up as Default Device in Windows Sound Recording devices. In the Sound
window click your microphone then click Set Default. Follow the steps below to setup Dual
Audio Recording:
·
In WM Capture Audio Settings check the Virtual-Audio
Plus then check the Dual Audio
checkboxes.
·
In the Audio
Sources drop down list select your microphone source (internal or
external).
·
Click OK to exit.
The Mute/Unmute button on the main
screen or the hotkey can be used to mute/unmute the microphone. Muting the
microphone is sometimes necessary to avoid the echo feedback between the
speakers and the microphone. When enabling this option, a hotkey can also
be selected to mute/unmute the microphone. To enable the mute/unmute option
the microphone should be set as the Default Device in Windows Sound,
Recording Devices dialog. Click Settings,
Windows Sound to access Windows audio settings. Or open Windows Sound
dialog from Windows Sound settings.
Changing the default
media player
Click View on the main
screen then click Default player or
VLC in the View dialog. If available, VLC Media Player is the default
player for WM Capture recordings.
Troubleshooting
Marked screen
region not detected
Marked coordinates are out of the current monitor area. Maybe a
second monitor was used but was turned off. Disconnect the second monitor,
select Monitor #1 in Settings, and reset the screen coordinates (under
Settings, Tools, Video options, Reset Markers).
Recorder video is
choppy
To get the best quality video - especially on slower machines - try
the following:
· Make
sure the CPU is not overloaded.
· Use
MPEG-2 or H264 video formats.
· On
Vista and Windows 7 use Windows
Basic theme, the Background mode
or the “Best Performance” mode instead of “Best Appearance” mode. Windows Basic theme is the default
setting for WM Capture. To change Windows performance mode open Settings /
Tools / Windows Best Performance. On Windows 8 or higher versions, try to
use the Background mode.
· Try
recording from a smaller video window by resizing your video window
(usually 1280x720 pixels) instead of using the full screen. In most cases
this won't affect the video quality (since the original streaming movie
videos are scaled UP from smaller sizes to fit a full-screen picture). This
requires less computer power to capture. (click here
for more about this)
· Use
a lower frame rate. For example, 20 fps or 15 fps.
Trouble recording
audio (see Settings / Help / Audio Troubleshoot).
“Cannot install
Virtual Audio Capturer” error
message
Run x86_2010 and x86_2013
redistributable from WM Capture, Settings, Miscellaneous, Install Microsoft
Redistributable
The recorded video
is all black or white
This occurs when a media player or a browser uses (graphics)
hardware acceleration. Disable graphics (hardware) acceleration (see
Settings, Useful tips)
For DVD recordings use a DVD player that plays DVD without using
hardware acceleration (for example VLC Media Player with disabled hardware
acceleration (Tools, Preferences, Video – Use GDI video output).
Cannot play MPEG-2
files created by WM Capture
The default Windows 10 player (Movies & TV) does not include
MPEG-2 codecs in some cases. It offers a free download codec which should
be installed. This is also the case with some older versions
of Windows Media Player cannot playback MPEG-2 files in which case use
the VLC media player.
MPEG-2 video sizes are half the recorded size
when played with Windows Media Player
Use a different media player (VLC for example).
"Cannot Run
Graph” or “Cannot install ...
filter” error
messages
This error can also indicate a failure to setup recording. Some of the
reasons this error occurs are listed below
·
audio recording cannot be setup when
different programs try to take exclusive control of the audio device. In Windows 7/8/10 Sound dialog open the
Advanced tab and disable the Exclusive Control.
·
a selected audio recording source like a
playback, microphone or Stereo Mix is disabled or not set as Default
·
video window size is too big, or the video
window extends on more than one monitor
·
Run x86_2005 distributable from WM Capture,
Settings, Miscellaneous, Install Microsoft Redistributable 2005
·
DirectX failure. You need to have DirectX
version 9 or higher installed to run WM Capture. To find out what DirectX
version you have click the Start button, type dxdiag in the Search box the hit ENTER. You can update your
DirectX from Microsoft's site here.
Try to reinstall WM Capture codecs as follows
·
close WM Capture
·
right click WM Capture desktop icon to open
the installation folder (usually C:\Program Files (x86)\WM Recorder-2\WM
Capture 10) then open the Bin9 folder)
·
find file _install_all.bat, right click and
Run as administrator
Run WM Capture again.
“Recording error (x013). WM Capture will
close now”
This error indicates that recording could not be
started in less than 20 seconds for an unspecified reason. Most of the time
this occurrence shows that your system cannot handle the specified frame
rate and/or the size of the recorded video window. Lower the frame and/or
the size of your video.
Also try to disable audio recording in Settings. If video records ok, make
sure the Virtual-Audio Driver Plus is utilized (under Audio Setup).
Troubleshooting the
background mode
· Avoid
having multiple windows opened. Only one window should be used for
recording. Open a new window or drag the video window tag out of a multiple
tag browser.
·
If
using Chrome Canary browser try to open this browser from the help Options menu instead of the desktop
shortcut.
·
The recorded video is all black, all
white or shows a still image. Background mode may not work with web
browsers utilizing hardware acceleration. You can try using the Google Chrome Canary (see Options,
Google Chrome Canary). Or you can
disable the browser acceleration (see Settings, Help, Useful tips)
·
The message "No window selected for
Background recording" is displayed. In this case there
may be no visible window except the desktop. If a window is present, click
the caption (top) bar of the window or restart WM Capture. You can also try
Options, Wakeup.
·
The recorded video
rectangle is shifted upwards. In some cases, the recorded video
rectangle has an offset equal to the size of the taskbar. You need to move
the entire marking rectangle upwards by the same amount. Use one of the
options Move DOWN or Move UP under ?/Monitor Scaling.
|